My Blog Button

My Beautiful Kiddos

My Beautiful Kiddos

My Love and I

My Love and I
Vote For Us @ Top Mommy Blogs
Military Spouses Blog Network
Happy Kids, Inc

Labels

Powered by Blogger.

Search This Blog

Saturday, January 28, 2012

Deployment Care Package Ideas

Like I said in my "About Me" section both my husband and I are active duty in the Air Force. It is definitely challenging at times with having two kids and trying to work out our work schedules so that way someone is home with the kids in the evenings BUT I wouldn't trade it for the world!
I am definitely one of those moms that would love to be a SAHM but I know that I would go stir crazy so bad. When I was on maternity leave it was wonderful til about the last week because I just felt like I needed to be back at work and being productive in my job. So let me say I am jealous of all you SAHM because you all can handle the daily home stress way better than I can!

My husband is currently deployed but actually in transit back to the states so I should be seeing him in the next few days and I am so very excited. While he was gone I sent him quite a few care packages of things he needed and then of course things I wanted to surprise him with to spoil him a little bit. So I thought I would share my ideas on care packages.

1. DON"T go online and order a prepackaged care package from a website- for 2 reasons. One they can very easily get lost on the mail. I had sent one to my husband back in 2009 and it never made it there and I was out 50 bucks. And secondly they aren't really that personable. Our spouses like something that you have put thought into. Even if it is a small package with just a few things they really enjoy that you took the time to go out and buy those things for them and send it instead of going online and in 5 seconds ordering the first package you see.


2. Put a card in the package. It doesn't have to be a novel that you have written it can just be a simple note or a "Miss You" Hallmark card. They are sentimental and lets your spouse know you are thinking about them. 


3. Send their favorite snacks! You can never send too many snacks for them. Most of the time if they don't want every snack in their care package they will put it in the community pile so that anyone from their work can have it they want. This deployment that my husband is on the chow hall had horrible food and I think I heard him complain about that more than anything else. So I knew he loved tuna so I sent him a huge box of tuna and some mayo to mix it with. I have never seen my husband so happy over something to menial but it is the small things that they love!

4. If you have kids have them draw pictures for them. I think this is by far the best thing you can ever put in a care package for your spouse if you have kids. My husband and I both deployed at the same time in 2009 and my mom had my daughter draw pictures and I cried when I saw them because they were so cute and I loved how she would draw a house with all of us in front of it. She also would write little notes on her pictures and that just tugged at my heart strings!


5. I am torn whether to put this on my list or not because each unit and person that deploys is different. When I deployed I asked people NOT to send me baby wipes. The reason being is that is the first thing that people think of to send someone since it is the desert and it is dusty. Well I had baby wipes coming out of my ears because there were so many already there. I did like when people sent the disinfecting wipes though. Those made me feel like something was cleaner than when I just used a baby wipe.

?????

6. For women that deploy: Send them girly stuff! So when you are at your deployed location most everything is tan. NOT a cute girl color! Yes we are at war but we still like to feel like girls at the end of the day and pamper ourselves. It can be something simple like some nail polish or a small pedi kit to keep your feet looking pretty. I loved when my best friend sent me a cute pink VS blanket to put on my bed and when I would get cute new eye shadows from my other friends in the mail. Really made my week!


7. Lastly send them some funny stuff. My boss got sent 8 small water guns so we went out and had a water gun fight one day at work. Made us laugh and for a moment forgot that we were in Iraq doing the same every day. 

Hopefully these ideas help because I know how sometimes you can draw a blank on what to send someone!
 photo signature.png

Friday, January 27, 2012

My Not So Fun Week

Yes that's right this week has been pretty stressful! Ever have a week that you wish would just hurry up and go over with and hope the next week is a million times better? Me too!
So my three month old Olivia woke up on Saturday last weekend with a bit of a cough. Not really any other symptoms going on so I thought ok I'll just watch and see how she does. Well by Sunday night she was running a slight fever and the cough was getting worse. 
Off to the doctor I went on Monday. Diagnosis: Bronchiolitis. Fun..NOT! So no daycare and I had to stay home from work. Follow up appointment on Wednesday.
On Wednesday my week got even better (insert sarcastic look here). Diagnosis: Double Ear Infection.
I felt just awful for Olivia and thankfully the meds are working for her ear infection. If you would see her in person you would never know that she is this sick until you hear her cough. She still giggles and smiles and is playful. Expect maybe for a little bit in the evenings when the fever will creep back up.
Well back for another followup today. Official diagnosis: RSV. I have to be honest and say I wasn't totally surprised. After the Bronchiolitis diagnosis I did some online research and RSV and Bronchiolitis are quite similar so I was prepared to hear it at the appointment today. However that doesn't make it any better!
So we have to continue the antibiotics for the ears and the inhaler treatments for the cough and hope that she gets better over the weekend! 
The one bright ray of light is that Daddy gets home from deployment in two days! Help is on the way!

Here's to hoping everyone has a great weekend!
 photo signature.png

Wednesday, January 25, 2012

The Wall Says It All

Awhile back I saw a very cute poem on Pinterest that I wanted to use in Olivia's bedroom. I decieded to put the poem on a picture frame instead of stickers on the wall for two reasons. One, we are renting our house here since we still own one in Utah and I don't want to put stickers on a wall and then move in a year or two and then I have to take the stickers down and they would be worthless. And two, I don't have a sticker maker (YET!!) so i figured it would be cheaper to make it on a picture frame.

Ok so first you will need:
-A picture frame: I got mine for 5 bucks at Walmart
-Alphabet stickers: I also got mine at Walmart *I would recommend going to Michael's for the stickers because they have a bigger selection and will be cheaper. I had to buy 4 packets of stickers because there were certain letters that I needed more of and each pack only had 1 maybe 2 of each lowercase letter.
-Any other stickers you want to use. * I used some butterflies because my daughter's room has a butterfly theme. 
-Hot glue gun to keep the glass in place in the frame

I cut out each individual letter and placed it on the frame as seen below so that way you can see your placement ahead of time before actually sticking them to the glass.

After you stick the letters to the frame, flip the frame over and put glue using the glue gun on each of the four corners to hold the glass in place.


I hung it up like so! 


 This is an extremely easy craft to do and the longest part is putting the stickers on the glass. Super fun and you can do it for any room!

Happy Crafting!


 photo signature.png

Monday, January 23, 2012

Sunday Funday!

I realize as I am writing this that it isn't Sunday anymore BUT I did do this fun craft on Sunday. My diva 3 month old however decided that she wanted to be held most of the evening so I am just now posting this.


So I went to Michael's yesterday (my official favorite non clothing store!) and took a look around at something fun to do. As I was walking around the wood crafts I found a cute 3 hanging picture that can be decorated and the idea came to me.

Here are the supplies I used. Paint is optional if you want to paint the sides of the picture frames. I eventually decided against it but I had bought some paint just in case.


I used the frame to trace around and cut it out. I then took the scrapbook paper and lined it up and then on the inside I traced again to cut out the middle.


I used an exacto knife to cut out the middle because that was the easiest way to do it and made the cleanest cut.

I cut the pictures to fit the frame (once again with an exacto knife) and here is the final product!

Super easy craft that cost about 7 bucks total! 

Happy Crafting!!
 photo signature.png

Saturday, January 21, 2012

Valentine's Day Gift Ideas

It just seems like Christmas was just the other day but alas Valentine's Day will be here before you know it! I went searching for Valentine's Day Gift Ideas and I especially love ones that I can make at home and ones to make with the kids.


Better Homes and Gardens has a wonderful selection of gift ideas and I just want to share a few of my favorite from the link above.

1. Make your own love basket!
I like this one and it doesn't have to be a movie basket per say so I think I might change it up a bit and make it a love basket with some of my hubby's favorite things in it.


2. Scratch off VDay Card
This is perfect AND what is even better is that you can do this for birthday cards too! 


3. Pail Full of Flowers
This is super cute and I would probably make it at home for a decoration!


 photo signature.png

Tuesday, January 17, 2012

Burt's Bees Baby Bee Nourishing Baby Oil


I have been meaning to write this post for awhile now but I just want to rave about this product!My youngest one Olivia is 3 months old and when she was about a 6 weeks old her face started to break out with baby acne. While most say baby acne will come and go as it pleases I at least wanted to try to help her skin along! I didn't want to put lotion on her face and clog her pores and make it worse so I went to the store looking for my baby oil that would keep her skin moistened but also allow it to heal and become soft again and Burt's Bees Baby Oil did just that! I can be a little pricy but it is totally worth every penny! 

Before

About 3 weeks after!

Love this product and pretty much anything that Burt's Bees makes!!
 
 
 photo signature.png

Sunday, January 15, 2012

Leelou Blogspot!

Want some cute FREE blogger templates!?!?! Look no further than Leelou Blogs for the best ones! Thanks for the new template!
 photo signature.png

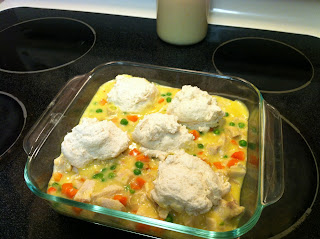
Easy Chicken and Dumplings

Just like most other moms I know I am always running around wishing there was an additional 6 hours in the day to get everything done that I need to. Sometimes I barely have time to throw a good dinner together so I am constantly looking for quick 30 minutes or less meals to make. Well I have one to share that I love and perfected myself.
I had found a few Chicken and Dumplings recipes online but none of them were really quick like I wanted but I few had some ingredients that if thrown together would be pretty quick.
So here you go!

You will need:
1 1/2 lb of chicken
2 cans cream of chicken
1 can chicken broth (low sodium or sodium free)
garlic salt
1-2 cups of frozen peas and carrots
Bisquick (I use Heart Smart Bisquick)
Milk
8x8 glass baking dish 
 
*Preheat the oven to 350 degrees.

1. Boil the chicken until thoroughly cooked through. 

2. In another pot combine the 2 cans of cream of chicken and pour HALF the can of chicken broth in. Turn on the heat to medium.  From there mix it together and continue to add more chicken broth depending on how thick or thin you want the sauce. I usually add anywhere from a half to 3/4 of the broth. Add the peas and carrots. Add some garlic salt. I don't put in a specific amount I just dash it in until I like how much has been added. Stir all together til it is mixed thoroughly.
3. Once the chicken has been cooked, cut the chicken up into bite size pieces and add it to the chicken sauce.

4. Pour the chicken and chicken sauce into the 8x8 baking dish. 

5. Follow the recipe on the side of the bisquick box for dumplings. If you don't have it, this is it:
combine 2/3 cup of bisquick with 3 tablespoons of milk. I have found that 3 tablespoons isn't enough and will usually add another one. Feel free to add as many more tablespoons as you need depending on how thick you want your dumplings.
*I also double the dumpling recipe otherwise you only get about 4-5 dumplings.

6. Spoon out dumplings and put it on top of the chicken mixture in the baking dish.

7. Bake in the oven for 10 minutes and remove. Let cool for 5 minutes before serving.

Makes about 4-5 servings.

I made this last night and didn't make as much as the recipe called (I only used one can of cream of chicken) because my husband isn't home so my daughter and I won't eat as much as if he were here. But otherwise the chicken mixture will come almost to the top of the baking dish.


 photo signature.png

Saturday, January 14, 2012

National Hobby Month!

January is National Hobby Month!

 
Michaels has a coupon for 25% off anything you buy on Monday that is regular price! It is only good for Monday January 16th so go use it and craft it up!
I will be there but not sure what I am going to get yet but a coupon gives me a reason to go shopping!

Here is the link for the coupon

Happy Crafting!
 photo signature.png

Cake Pops!!

Cake Pops! 
I really don't need to write anything else because the pictures say everything but I will just say they are delicious and oh so bad because I want to eat them all!
So I have never made them until I tried this recipe and it really is a no fail easy recipe to use. 
A few weeks ago my best friend came down to visit from Atlanta and her and my 7 year old made some cake pops for a friend that is deployed. Unfortunately I didn't partake in making them with them so I figured I would try out the recipe she used and see how it went.
She used the recipe from this site How to Make Cake Pops

The only variation I made from this recipe is that I used the whole jar of icing instead of just half. A coworker of mine also used this same recipe and she also just the whole jar too.

 Melt the chocolate in one bowl.

 Put the sticks in the formed balls. You can dip the stick in the chocolate first but when I tried it I didn't see a difference than just sticking the stick in normally. Let them set for just a second and then dip the ball in the chocolate.

 Add some sprinkles for color.

They are super delicious and the only way to know for sure is to make them yourself!
 photo signature.png

Thursday, January 12, 2012

Korean Beef Bulgogi

About 6 years ago I was stationed in Korea for a year and that was my first time to eat Beef Bulgogi and it was love at first bite! It really isn't that hard to make the longest part is letting it marinate. I found a really easy recipe on my favorite site All Recipes for new recipes to try out.

So first here is the link to the recipe that I used Beef Bulgogi.

 Cut the flank steak into THIN slices...I mean THIN!!!

Mix all the other ingredients together in a bowl.

 Then pour it over the steak and make sure all the steak is covered in it.
Allow it to marinate for 24 hours! I did it from 9am to 5pm and I for sure next time will marinate it longer!

The only deviation I made from the original recipe is that I used brown sugar instead of white sugar and it was perfect!

Of course I was extremely excited to eat the bulgogi that I forgot to take a picture of my final product but it looks just like the others on the site and it tastes sooooo good!!


 photo signature.png

Tuesday, January 10, 2012

Reason #45678998 Why Kirkland's Rocks!!

I LOVE Kirkland's! It is one of my most absolute favorite decorating stores. It is affordable, cute and most importantly I love their military appreciation decor!

Case in Point:

Thank you Kirkland's! It completes my house!!
 photo signature.png

The Results Blog!

So it has been a few days since I wrote about the Dollar Store Dare I gave myself and I am here to show my results!! I can't take full credit for it all because while I was walking around the store I saw some items I could use to make a previous craft I had seen but it was made with different materials. So here is the link to the original craft I saw Calendar Craft.

So here are my items that I purchased from Dollar General and Dollar Tree.


So I bought a picture frame, ruler, dry erase markers, and white poster board from Dollar General. I bought the glue stick from Dollar Tree.

So I took a piece of the white poster board paper and drew out the calendar at the bottom half of the paper. Then towards the top of the paper I made a rectangle so that I would be able to write in the month. 
I did add an S to the side since that is what my last name starts with out of some extra scrapbook paper laying around.
Once I had it done I put the calendar into the frame and voila!!


Super easy to make and super fun as well! 


Happy Crafting!


 photo signature.png

Sunday, January 8, 2012

It's Giveaway Time!!

So as I am starting to get this whole blogging thing down better I think it is time for a giveaway. BUT it isn't quite that easy. Once I get 20 followers I will give the details of the giveaway...so come join because who doesn't like free stuff!!!
 photo signature.png

Happy Helpers!!

If your kids are anything like my 7 year old it can be like pulling teeth to get them to help you clean up the house. Well worry no more!

This past weekend Taylor told me that she wanted to get an allowance like her other friends. Well I told her that she had to do chores around the house to EARN an allowance. Of course she gave me "the look" and then it changed when I told her we could make a fun craft to use for her chores. Alas the Chore Bucket was born!

It is super easy to make and your kids can pretty much do it all too!

You will need :
a bucket (Home Depot has a 2.5 qt metal bucket for like 3.50)
letter stickers for the front of the bucket (3.00 at Walmart)
clothes pins ( a few bucks for a 50 pack)
markers

Take the letter stickers and use them to write on the bucket. My child's says "Taylor's Chore Bucket." Use the markers to write on each clothes pin the chore. Once all the chores are done you can clip them around the rim of the bucket.

Super easy right?!?!


Happy Crafting!


 photo signature.png

Saturday, January 7, 2012

The Dollar Store Dare!

That right I am daring myself to make a craft using only stuff I find at the dollar store. We have two dollar stores in Cabot- The Dollar Tree and Dollar General. I'm gonna give myself a little slack this time and go to both stores to see what I can come up with. I am actually super excited about this because you never know what you are going to find AND it is all stuff for super cheap!

Honestly I have no idea what type of craft I want to make so I am pretty sure I am going to come home with lots of random stuff but that is what makes it so much more fun! So expect pictures and a new post later to see my new creation!

Wish me luck and try the dare too!!

~April

 photo signature.png

Thursday, January 5, 2012

Body After Baby!?!?!

I am sure many mothers wish their bodies would just go back to that perfect size they were before they had baby and even during the whole pregnancy they thought "Man it's going to be easy to get back into shape." Then baby comes! 


You are not alone!! The baby literally consumes all your time and when you aren't feeding or changing the baby or rocking the baby to sleep you have to fit in time to pick up the house and get some sleep yourself! Trust me I know this all too well. 
Being a mom of two now with a 7 year old and a 2 month old life can be challenging. I am sure even for my 7 year old who is a tremendous help when I am feeding baby and can't do anything. 


So where do you find time to fit in a workout? And more importantly since you now realize how out of shape your body is because let's face it going through pregnancy and giving birth does a number on your body what do you do to get back into shape. 
I had those same questions so I started to look around. I realized that paying for a trainer is not an option now with baby #2 adding additional costs to the income. But there are so many online resources to help that sometimes you don't need to pay for a trainer you can find everything you need online. 


Well I love the website Bodybuilding.com and found it a few years ago when my husband and I started to really take fitness seriously. There are many people that will list their workouts they have done to get back into shape so after searching for awhile and with my husband helping me I found a really great one!


Her name is Sarah Benischek and like so many moms struggled to figure out how to shed the pounds and tone up again. Her program includes her workout and nutrition plans. Now if you are like me and BFing then you will need to adjust the nutrition plan as I have done to add more calories and a balance of food and also no supplements!  


So I just thought that I would pass along this wonderful plan that I found on their site that so far has worked out for me. Through the holidays and all the food grazing that it consists of I still managed to lose weight and I am now 5 pounds below my pre-baby weight! 


So here is a link to her page so please take a look and I hope it helps you as it has helped me!


Body Transformation Workout!
 photo signature.png

Monday, January 2, 2012

Glass Coke Vases

So this past holiday season at Walmart they had a 4 pack of Coke in vintage glass bottles. Of course my daughter HAD to have them and even they we don't keep soda in our house I caved partially because when you don't ever have soda it just tastes so much better and then also because the glass bottles were so cute.

So when Taylor and I had finished two of them I cleaned out the bottles and put them on my kitchen windowsill so I could try to figure out what to do with them because I couldn't bring myself to throw them away.

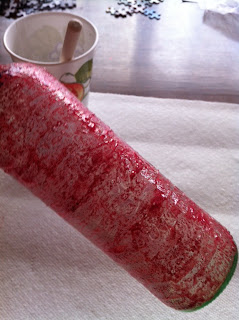
So after thinking for a bit I thought it would be cute to paint them and stick some fake flowers in them. It will add some color to whatever room I put them in. Well I finally have had a chance to sit down and try out my creation.


Here is what I used. Pretty easy right! 
The paint is Martha Stewart Multi Surface Glitter Acrylic Paint. I belive it was like 6 maybe 7 bucks at Michael's. The foam paintbrush was like $1.50ish.

So you have to dab the paint on because if you brush it then it streaks unevenly. I had to do about 3 coats of paint but you can always do more or less if you want.

So here is my final product. I bought the flowers at Walmart and they were on sale for .75 and 1.50 each!

Happy Crafting!!

 photo signature.png